
A Frightfully Fun Treat: Easy Halloween Monster Cookies - October 13, 2026
Treasure Tower Rewards Canada Ltd. on 2026 Oct 12th
Some Halloween treats are almost too cute to eat. These little monsters don’t have that problem—they’re far too delicious to leave on the plate!
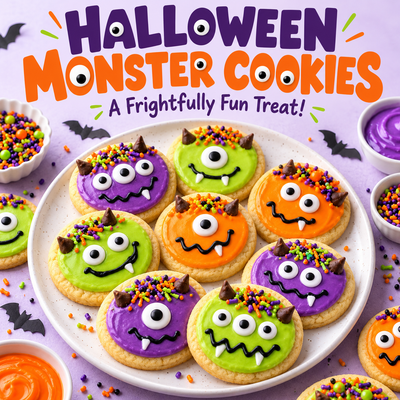
With colourful icing, silly faces and delightfully mismatched eyes, Halloween monster cookies are a fun way to bring everyone into the kitchen. You don’t need fancy decorating skills, either. A crooked grin or an extra eye simply gives your monster more personality.
Make a batch for a Halloween gathering, a family movie night or a rainy October afternoon. Half the fun is seeing what everyone creates.
Easy Halloween Monster Cookies
These soft sugar cookies make a simple base for your colourful creations.
Makes: Approximately 24 cookies
Prep time: 20 minutes
Baking time: 10–12 minutes per batch
Additional time: Cooling and decorating
Ingredients
For the cookies:
-
½ cup unsalted butter, softened
-
¾ cup granulated sugar
-
1 large egg
-
1 teaspoon vanilla extract
-
1½ cups all-purpose flour, spooned into the measuring cup and levelled
-
½ teaspoon baking powder
-
¼ teaspoon salt
For the decorating icing:
-
2 cups icing sugar
-
2–3 tablespoons milk, added gradually
-
½ teaspoon vanilla extract
-
Purple, green and orange gel food colouring
For the monster faces:
-
Candy eyes
-
Colourful sprinkles
-
Mini chocolate chips
-
Black decorating icing
Let’s Make Some Monsters!
1. Prepare your baking trays
Preheat your oven to 350°F (175°C). Line two baking sheets with parchment paper.
2. Mix the cookie dough
Beat the softened butter and granulated sugar until light and creamy. Add the egg and vanilla, then mix until combined.
In a separate bowl, whisk together the flour, baking powder and salt. Gradually add the dry ingredients to the butter mixture, mixing just until a soft dough forms.
If the dough feels too sticky to handle, refrigerate it for 20–30 minutes.
3. Shape and bake
Scoop level tablespoon-sized portions of dough and roll gently into balls. Place them about 2 inches apart on the prepared baking sheets, then flatten slightly.
Bake for 10–12 minutes, until the edges are set and the bottoms are lightly golden. The tops should remain pale.
Let the cookies rest on the baking sheet for 5 minutes before transferring them to a wire rack. Cool completely before decorating.
4. Bring on the colour
Stir together the icing sugar, vanilla and 2 tablespoons of milk. Add more milk a little at a time until the icing is thick but spreadable.
Divide it among small bowls and tint each one a different colour. A little gel colouring goes a long way!
If the icing becomes too runny, stir in a little more icing sugar.
5. Give your monsters some personality
Spread icing over each cooled cookie. Add candy eyes and sprinkles while the icing is still wet.
Try one enormous eye, three tiny eyes or a pair looking in completely different directions. Use mini chocolate chips for noses or little horns.
Let the base icing set before piping mouths with black decorating icing. A wobbly smile is perfectly acceptable monster behaviour.
Make Decorating Part of the Fun
Set out the decorations in small bowls and give everyone a few cookies to design.
You could create a whole monster family: a surprised purple monster, a grumpy green one and an orange creature who looks as though someone just ate the last cookie.
Invite children to name their creations before serving them. “Professor Sprinklefang” certainly sounds more interesting than “the one on the left.”
For younger decorators, soft icing details can replace hard candy decorations.
Short on Time? Take a Shortcut
Use plain store-bought sugar cookies and ready-made frosting. You’ll still get all the fun of decorating, with fewer bowls in the sink.
White chocolate chips dotted with a little black icing can also stand in for candy eyes. Sprinkles become wild hair, and a simple icing zigzag makes a wonderfully silly mouth.
A Treat Worth Sharing
Allow the decorations to set before stacking the cookies, and place parchment paper between layers in an airtight container. They’re best enjoyed within three days.
If you’re taking them to a gathering, check for food allergies and keep ingredient information available.
The nicest thing about these Halloween cookies is that no two need to look alike. Some will be adorable. Some will be ridiculous. One may end up with seven eyes and no mouth.
That’s all part of the fun.
Happy baking—and may your Halloween be full of little monsters and big smiles!